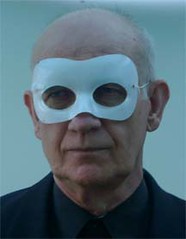
photoshop extraction tutorial
I wrote out these steps based on a number of tutorials I have been studying over the past three days. It's a compilation of some new techniques I have learnt.
It's made me think about the connection between theory and practice. I've been wanting to know what channels are in photoshop and what they are good for. But how can you know what a channel is unless you use a channel to do something useful? Not much point in only reading about the theory of what channels are. You need both the theory and the practice but the practice is indispensible and has immediate practicality.
IMPROVE IMAGE CONTRAST
1) Level adjustment (Image > Adjustment > Levels or Ctrl + L) to improve histogram, better balance between highlights, dark and middle tones
ROUGH OUT SELECTION THEN IMPROVE IT
2) Magic wand, for rough selection, play with tolerance up and down from 32
Shift to expand selection (+), Alt to contract selection (-)
3) Select > feather 3 px, perhaps lower this value – not sure
Feathering may be causing the blue fringe problem, how to fix??
4) Quick mask (Q key or click the quick mask icon)
5) Level adjustment to modify rough selection to better fit
(Image > Adjustment > Levels or Ctrl + L)
This only works if preceded with feathering
6) Modify quick mask further with Brush tool, swapping between black (adds to mask) and white (subtracts from mask)
Use X key to toggle between black and white
7) Exit quick mask when done (Q key)
8) Zoom in (Ctrl + +) and check how close running ants are to shape outline
9) Select > Modify > Expand or Contract to line up running ants with shape outline as closely as possible
STORE SELECTION IN A CHANNEL
With selection still active (means you can still see running ants):
10) Click Channels tab in Layers dialogue
Create new channel to create new alpha channel (black, Alpha1)
11) Stroke selection (Edit > Stroke), must be white, enough to cover soft edges (10 px)
Stroke on inside if background selected
Stroke on outside if main figure selected
12) Deselect, remove selection (no more running ants)
13) Apply Gaussian Blur (Filter > Blur > Gaussian Blur 2 px)
14) Invert the channel (Image > Adjustments > Invert or Ctrl + I)
15) Return to layers palette
16) Click on image layer we are working on
We have stored our selection as a Channel
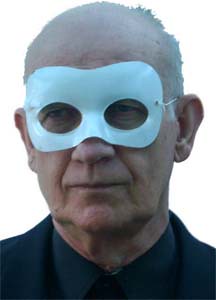
FINALISE SELECTION USING THE EXTRACT FILTER
17) Filter > Extract
18) Once in Extract then choose Alpha1 from the channel pull down menu
19) Touch up with Hilighter (define edges) and rubber
20) Paint bucket to fill selection
21) Preview and touch up further if necessary
22) OK when ready, your image is extracted
It's made me think about the connection between theory and practice. I've been wanting to know what channels are in photoshop and what they are good for. But how can you know what a channel is unless you use a channel to do something useful? Not much point in only reading about the theory of what channels are. You need both the theory and the practice but the practice is indispensible and has immediate practicality.
IMPROVE IMAGE CONTRAST
1) Level adjustment (Image > Adjustment > Levels or Ctrl + L) to improve histogram, better balance between highlights, dark and middle tones
ROUGH OUT SELECTION THEN IMPROVE IT
2) Magic wand, for rough selection, play with tolerance up and down from 32
Shift to expand selection (+), Alt to contract selection (-)
3) Select > feather 3 px, perhaps lower this value – not sure
Feathering may be causing the blue fringe problem, how to fix??
4) Quick mask (Q key or click the quick mask icon)
5) Level adjustment to modify rough selection to better fit
(Image > Adjustment > Levels or Ctrl + L)
This only works if preceded with feathering
6) Modify quick mask further with Brush tool, swapping between black (adds to mask) and white (subtracts from mask)
Use X key to toggle between black and white
7) Exit quick mask when done (Q key)
8) Zoom in (Ctrl + +) and check how close running ants are to shape outline
9) Select > Modify > Expand or Contract to line up running ants with shape outline as closely as possible
STORE SELECTION IN A CHANNEL
With selection still active (means you can still see running ants):
10) Click Channels tab in Layers dialogue
Create new channel to create new alpha channel (black, Alpha1)
11) Stroke selection (Edit > Stroke), must be white, enough to cover soft edges (10 px)
Stroke on inside if background selected
Stroke on outside if main figure selected
12) Deselect, remove selection (no more running ants)
13) Apply Gaussian Blur (Filter > Blur > Gaussian Blur 2 px)
14) Invert the channel (Image > Adjustments > Invert or Ctrl + I)
15) Return to layers palette
16) Click on image layer we are working on
We have stored our selection as a Channel
FINALISE SELECTION USING THE EXTRACT FILTER
17) Filter > Extract
18) Once in Extract then choose Alpha1 from the channel pull down menu
19) Touch up with Hilighter (define edges) and rubber
20) Paint bucket to fill selection
21) Preview and touch up further if necessary
22) OK when ready, your image is extracted
posted by Bill Kerr at 11:15 PM
![]()
![]()
 Listen to this article


0 Comments:
Post a Comment
<< Home